RESTful APIs
Xitrum으로 iPhone, Android 등의 앱을 위한 RESTful APIs를 간단하게 만들 수 있습니다.
import xitrum.Action
import xitrum.annotation.GET

@GET("articles")
class ArticlesIndex extends Action {
  def execute() {...}
}

@GET("articles/:id")
class ArticlesShow extends Action {
  def execute() {...}다
}
POST, PUT, PATCH, DELETE, OPTIONS 뿐만 아니라 Xitrum은 HEAD의 GET 요청을 빈 바디응답으로 자동으로 처리합니다.
일반 브라우저처럼 PUT과 DELETE를 지원하지 않는 HTTP 클라이언트에서도
PUT과 DELETE를 구현하려면 응답 본문에 _method=put 나 _method=delete 를 포함하여
사용할 수 있습니다.
어플리케이션을 시작할때 Xitrum 어플리케이션을 스캔하여 라우팅 테이블을 만들고 출력합니다. 다음과 같은 로그에서 어플리케이션이 어떤 API를 지원하고 있는지 알 수 있습니다.
[INFO] Routes:
GET /articles     quickstart.action.ArticlesIndex
GET /articles/:id quickstart.action.ArticlesShow
라우팅은 JAX-RS과 Rails의 철학에 따라 자동으로 수집됩니다. 모든 경로를 한군데에 설정할 필요가 없습니다. 분산 라우팅처럼 이 기능 덕분에 어플리케이션을 다른 어플리케이션에 통합할 수 있습니다. 만약 블로그 엔진을 만든다면 패키징된 JAR파일을 다른 어플리케이션으로 가져와서 즉시 블로그 기능을 사용할 수 있습니다. 라우팅에는 두 가지 특징이 있습니다. 안전한 방법으로 루트를 재생성하거나(리버스 라우팅) Swagger Doc 이라고 하는 문서를 통해서 만들 수 있습니다.
루트 캐싱
어플리케이션 시작시 속도 향상을 위해 루트는 routes.cache 파일에 캐쉬됩니다.
개발 시에는 target 파일에 있는 클래스 파일의 루트는 캐쉬되지 않습니다.
만약 루트를 포함하여 라이브러리가 업데이트 된 경우에는 routes.cache 파일을 삭제하세요.
또한, 이 파일은 소스 저장소에 커밋되지 않도록 주의해야 합니다.
루트의 우선순위(first, last)
다음과 같은 루트를 만든 경우
/articles/:id --> ArticlesShow
/articles/new --> ArticlesNew
두 번째 루트를 우선시 할 경우 @First 주석을 추가시킵니다.
import xitrum.annotation.{GET, First}

@GET("articles/:id")
class ArticlesShow extends Action {
  def execute() {...}
}

@First  // This route has higher priority than "ArticlesShow" above
@GET("articles/new")
class ArticlesNew extends Action {
  def execute() {...}
}
Last 도 똑같이 사용할 수 있습니다.
Action에 여러 경로를 연동
@GET("image", "image/:format")
class Image extends Action {
  def execute() {
    val format = paramo("format").getOrElse("png")
    // ...
  }
}
점을 포함하는 루트
@GET("articles/:id", "articles/:id.:format")
class ArticlesShow extends Action {
  def execute() {
    val id     = param[Int]("id")
    val format = paramo("format").getOrElse("html")
    // ...
  }
}
경로의 나머지 부분 이용
/ 문자는 특수문자라서 매개변수에 포함되지 않습니다. / 문자를 사용하려면 다음과 같이 씁니다:
GET("service/:id/proxy/:*")
다음의 경로를 가져오게 됩니다:
/service/123/proxy/http://foo.com/bar
:* 를 가져오게 됩니다:
val url = param("*") // "http://foo.com/bar" 입니다
액션에 링크추가
Xitrum은 typesafe하므로 URL을 직접 사용하면 안 됩니다. 다음처럼 사용하세요:
<a href={url[ArticlesShow]("id" -> myArticle.id)}>{myArticle.title}</a>
다른 액션으로 리디랙션
import xitrum.Action
import xitrum.annotation.{GET, POST}

@GET("login")
class LoginInput extends Action {
  def execute() {...}
}

@POST("login")
class DoLogin extends Action {
  def execute() {
    ...
    // After login success
    redirectTo[AdminIndex]()
  }
}

GET("admin")
class AdminIndex extends Action {
  def execute() {
    ...
    // Check if the user has not logged in, redirect him to the login page
    redirectTo[LoginInput]()
  }
}
현재 액션을 다음을 이용하여 변경할 수도 있습니다. redirecToThis().
다른 액션에 요청 전달
forwardTo[AnotherAction]()사용시에는redirectTo은 다른 요청을 만들어서 전달하지만forwardTo는 요청이 유지됩니다.
Ajax 요청 여부 확인
isAjax을 사용합니다.
// In an action
val msg = "A message"
if (isAjax)
  jsRender("alert(" + jsEscape(msg) + ")")
else
  respondText(msg)
Anti-CSRF
GET 이외의 요청에 Xitrum은 기본적으로 Cross-site request forgery 방식을 고수합니다.
antiCsrfMeta Tags의 레이아웃에 명시한 경우:
import xitrum.Action
import xitrum.view.DocType

trait AppAction extends Action {
  override def layout = DocType.html5(
    <html>
      <head>
        {antiCsrfMeta}
        {xitrumCss}
        {jsDefaults}
        <title>Welcome to Xitrum</title>
      </head>
      <body>
        {renderedView}
        {jsForView}
      </body>
    </html>
  )
}
출력되는 <head> 는 다음과 같습니다:
<!DOCTYPE html>
<html>
  <head>
    ...
    <meta name="csrf-token" content="5402330e-9916-40d8-a3f4-16b271d583be" />
    ...
  </head>
  ...
</html>
- xitrum.js 이 템플릿 내에서 사용되는 경우,
- 토큰은 GET 요청을 제외한 모든 jQuery 의 Ajax 요청에
X-CSRF-Token을 포함합니다.
xitrum.js은 jsDefaults 에 포함되어 있습니다.
만약 jsDefaults 를 사용하지 않고 xitrum.js를 사용하고 싶다면 다음과 같이 사용합니다.
<script type="text/javascript" src={url[xitrum.js]}></script>
antiCsrfInput 과 antiCsrfToken
Xitrum은 CSRF토큰을 X-CSRF-Token 의 요청헤더에서 가져옵니다.
만약 요청헤더가 없다면 csrf-token 의 바디 파라미터에서 가져옵니다.
(URL의 파라미터가 아닙니다)
Form을 직접 작성할 때에 메타 태그와 xitrum.js을 사용하지 않는다면 antiCsrfInput 또는
antiCsrfToken 을 사용해야 합니다.
form(method="post" action={url[AdminAddGroup]})
  != antiCsrfInput
form(method="post" action={url[AdminAddGroup]})
  input(type="hidden" name="csrf-token" value={antiCsrfToken})
CSRF 체크 생략
스마트폰과 같은 기기를 위해서 API를 작성할 경우 CSRF체크를 생략할 수 있습니다.
xitrum.SkipCsrfCheck 를 Action에 추가하면 됩니다.
import xitrum.{Action, SkipCsrfCheck}
import xitrum.annotation.POST

trait Api extends Action with SkipCsrfCheck

@POST("api/positions")
class LogPositionAPI extends Api {
  def execute() {...}
}

@POST("api/todos")
class CreateTodoAPI extends Api {
  def execute() {...}
}
라우팅 조작
Xitrum 은 시작 시에 자동으로 경로를 수집합니다. 경로를 수정하고 싶다면 다음을 이용하세요 xitrum.Config.routes.
Example:
import xitrum.{Config, Server}

object Boot {
  def main(args: Array[String]) {
    // You can modify routes before starting the server
    val routes = Config.routes

    // Remove routes to an action by its class
    routes.removeByClass[MyClass]()

    if (demoVersion) {
      // Remove routes to actions by a prefix
      routes.removeByPrefix("premium/features")

      // This also works
      routes.removeByPrefix("/premium/features")
    }

    ...

    Server.start()
  }
}
요청 내용 가져오기
요청에 대한 타입이 application/x-www-form-urlencoded 이 아닐 경우에는
요청에 대한 내용을 가져오고 수동으로 파싱이 가능합니다.
문자열로 가져오기:
val body = requestContentString
문자열로 가져와서 JSON형식으로 변경합니다:
val myJValue = requestContentJValue  // => JSON4S (http://json4s.org) JValue
val myMap = xitrum.util.SeriDeseri.fromJValue[Map[String, Int]](myJValue)
요청 전체를 컨트롤 하려면 request.getContent 을 사용하면 됩니다. ByteBuf 타입으로 리턴합니다.
Swagger로 API 문서화 하기
Swagger 를 이용하여 API문서를 만들수 있습니다.
@Swagger 태그를 문서화하고 싶은 API에 명시하면 됩니다.
Xitrum은 문서파일을 /xitrum/swagger.json 에 생성합니다.
이 파일들은 Swagger UI 를 이용하여 인터렉티브한 API문서를 생성합니다.
Xitrum은Swagger UI 를 내포하고 있으며 /xitrum/swagger-ui 에서 확인할 수 있습니다.
: http://localhost:8000/xitrum/swagger-ui.
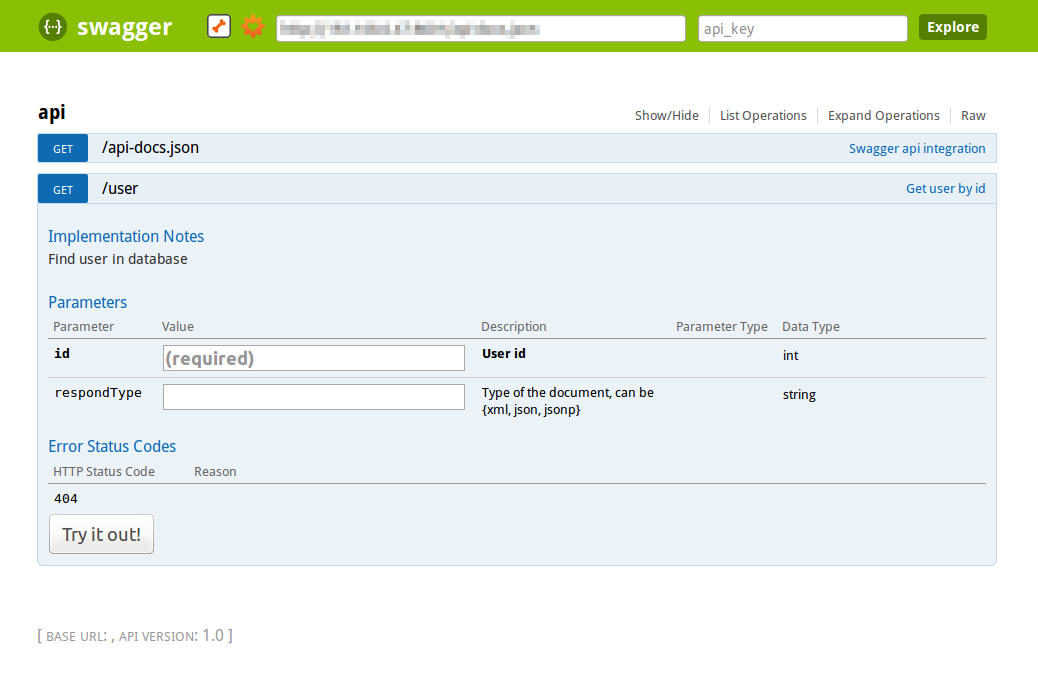
예제 는 여기에 있습니다.
import xitrum.{Action, SkipCsrfCheck}
import xitrum.annotation.{GET, Swagger}

@Swagger(
  Swagger.Tags("image", "APIs to create images"),
  Swagger.Description("Dimensions should not be bigger than 2000 x 2000"),
  Swagger.OptStringQuery("text", "Text to render on the image, default: Placeholder"),
  Swagger.Produces("image/png"),
  Swagger.Response(200, "PNG image"),
  Swagger.Response(400, "Width or height is invalid or too big")
)
trait ImageApi extends Action with SkipCsrfCheck {
  lazy val text = paramo("text").getOrElse("Placeholder")
}

@GET("image/:width/:height")
@Swagger(  // <-- Inherits other info from ImageApi
  Swagger.Summary("Generate rectangle image"),
  Swagger.IntPath("width"),
  Swagger.IntPath("height")
)
class RectImageApi extends Api {
  def execute {
    val width  = param[Int]("width")
    val height = param[Int]("height")
    // ...
  }
}

@GET("image/:width")
@Swagger(  // <-- Inherits other info from ImageApi
  Swagger.Summary("Generate square image"),
  Swagger.IntPath("width")
)
class SquareImageApi extends Api {
  def execute {
    val width  = param[Int]("width")
    // ...
  }
}
/xitrum/swagger 에 접근할때
JSON For Swagger
가 생성됩니다.
Swagger UI는 이 JSON 정보를 바탕으로 인터랙티브한 API 문서를 만듭니다.
여기에 있는 Swagger.IntPath, Swagger.OptStringQuery, 이외에도 BytePath, IntQuery, OptStringForm 등이 form에 명시되어 있습니다.
<Value type><Param type>(필수 값)Opt<Value type><Param type>(옵션 값)
Value type: Byte, Int, Int32, Int64, Long, Number, Float, Double, String, Boolean, Date, DateTime
Param type: Path, Query, Body, Header, Form
자세한 내용은 value type , param type 를 참고하세요.