


Wow, this is a really impressive body of work, arguably the most complete Scala framework outside of Lift (but much easier to use). Xitrum is truly a full stack web framework, all the bases are covered, including wtf-am-I-on-the-moon extras like ETags, static file cache identifiers & auto-gzip compression. Tack on built-in JSON converter, before/around/after interceptors, request/session/cookie/flash scopes, integrated validation (server & client-side, nice), built-in cache layer (Hazelcast), i18n a la GNU gettext, Netty (with Nginx, hello blazing fast), etc. and you have, wow.
特徴
詳細な使用ガイドがあります。
- Scalaの思想に基づく型安全。 全てのAPIは型安全であるべくデザインされています。
- Nettyの思想に基づく非同期。 リクエストを捌くアクションは直ぐにレスポンスを返す必要はありません。 ロングポーリング、チャンクレスポンス(ストリーミング)、WebSocket、そしてSockJSをサポートしています。
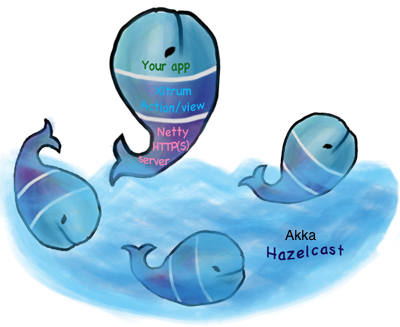
- Netty 上に構築された高速HTTP(S) サーバー。 (HTTPSはJavaエンジンとOpenSSLエンジン選択できます。) Xitrumの静的ファイル配信速度は Nginxに匹敵 します。
- 高速なレスポンスを実現する大規模なサーバサイドおよびクライアントサイド双方のキャッシュシステム。 サーバーレイヤでは小さなファイルはメモリにキャッシュされ、大きなファイルはNIOのzero copyを使用して送信されます。 ウェブフレームワークとしてpage、action、そしてobjectをRailsのスタイルでキャッシュすることができます。 All Google’s best practices にあるように、 条件付きGETに対してはクライアントサイドキャッシュが適用されます。 もちろんブラウザにリクエストの再送信を強制させることもできます。
- 静的ファイルに対する Range requests サポート。 この機能により、スマートフォンに対する動画配信や、全てのクライアントに対するファイルダウンロードの停止と再開を実現できます。
- CORS 対応。
- JAX-RSとRailsエンジンの思想に基づく自動ルートコレクション。全てのルートを1箇所に宣言する必要はありません。 この機能は分散ルーティングと捉えることができます。この機能のおかげでアプリケーションを他のアプリケーションに取り込むことが可能になります。 もしあなたがブログエンジンを作ったならそれをJARにして別のアプリケーションに取り込むだけですぐにブログ機能が使えるようになるでしょう。 ルーティングには更に2つの特徴があります。 ルートの作成(リバースルーティング)は型安全に実施され、 Swagger Doc を使用したルーティングに関するドキュメント作成も可能となります。
- クラスファイルおよびルートは開発時にはXitrumによって自動的にリロードされます。
- Viewは独立した Scalate テンプレートとして、 またはScalaによるインラインXMLとして、どちらも型安全に記述することが可能です。
- クッキーによる(よりスケーラブルな)、Hazelcast クラスターによる(よりセキュアな)セッション管理。 Hazelcastは(とても早くて、簡単に)プロセス間分散キャッシュも提供してくれます。 このため別のキャッシュサーバーを用意する必要はなくなります。これはAkkaのpubsub機能にも言えることです。
- jQuery Validation によるブラウザー、サーバーサイド双方でのバリデーション。
- GNU gettext を使用した国際化対応。 翻訳テキストの抽出は自動で行われるため、プロパティファイルに煩わされることはなくなるでしょう。 翻訳とマージ作業には Poedit のようなパワフルなツールが使えます。 gettextは、他のほとんどのソリューションとは異なり、単数系と複数系の両方の形式をサポートしています。
Xitrumは Scalatra よりパワフルに、 Lift より簡単であることで両者のスペクトルを満たすことを目的としています。 Xitrum はScalatraのようにcontroller-firstであり、Liftのような view-first ではありません。 多くの開発者にとって馴染み部会controller-firstスタイルです。
スケーラビリティが簡単!ノードをクラスタへ追加するだけでいいです。
Hello World サンプル
import xitrum.Action
import xitrum.annotation.GET

@GET("url/to/HelloAction")
class HelloAction extends Action {
  def execute() {
    val urlToHelloActor = url[HelloActor]
    respondHtml(
      <xml:group>
        <p>Hello {remoteIp}!</p>
        <a href={urlToHelloActor}>Actor example</a>
      </xml:group>
    )
  }
}
The above action runs directly on Netty's IO thread pool.
It's very fast if your action is simple.
If it's more complex, avoid blocking
request receiving and response responding,
by running it on another thread pool,
by extending xitrum.FutureAction.
Actor サンプル
import scala.concurrent.duration._
import akka.actor.ReceiveTimeout

import xitrum.ActorAction
import xitrum.annotation.GET

@GET("url/to/HelloActor")
class HelloActor extends ActorAction {
  def execute() {
    log.info("Request received: " + request)

    // Communicate with another actor
    anotherActorRef ! "aMsg"

    // Wait for the above actor to reply within 5s
    context.setReceiveTimeout(5.seconds)
    context.become {
      case aReply =>
        respondText(aReply)

      case ReceiveTimeout =>
        respondText("Timeout")
    }
  }

  override def postStop() {
    log.info("Connection closed or response sent")
    super.postStop()
  }
}
Actorを簡単にアノテーションを付けることで、そとのウェッブからアクセスできます!
WebSocket サンプル
import xitrum.{
  WebSocketAction,
  WebSocketText, WebSocketBinary,
  WebSocketPing, WebSocketPong
}
import xitrum.annotation.WEBSOCKET

@WEBSOCKET("url/to/EchoWebSocketActor")
class EchoWebSocketActor extends WebSocketAction {
  def execute() {
    log.info("WebSocket onopen")

    context.become {
      case WebSocketText(text) =>
        respondWebSocketText(text)

      case WebSocketBinary(bytes) =>
        respondWebSocketBinary(bytes)

      case WebSocketPing =>
        // Xitrum automatically sends pong for you,
        // you don't have to send pong yourself

      case WebSocketPong =>
        // Client has received your ping
    }
  }

  override def postStop() {
    log.info("WebSocket onclose")
    super.postStop()
  }
}
SockJS サンプル
import xitrum.{SockJsAction, SockJsText}
import xitrum.annotation.SOCKJS

@SOCKJS("url/to/EchoSockJsActor")
class EchoSockJsActor extends SockJsAction {
  def execute() {
    log.info("SockJS onopen")

    context.become {
      case SockJsText(text) =>
        respondSockJsText(text)
    }
  }

  override def postStop() {
    log.info("SockJS onclose")
    super.postStop()
  }
}
プレゼンテーション
テンプレートから新しい空のプロジェクトを作成
xitrum-new プロジェクトを参照してください。
xitrum-new.zip をダウンロード、解凍し、次のコマンドを実行:
sbt/sbt run空のプロジェクトが http://localhost:8000/ と https://localhost:4430/ で動くことを確認できます。
Eclipse プロジェクト生成:
sbt/sbt eclipseサンプル プロジェクト
ニュース
- Xitrum 3.30.1 Jan 20 2021
- Xitrum 3.30.0 Jan 18 2021
- Xitrum 3.28.18 Sep 7 2019
- Xitrum 3.28.17 Jun 4 2019
- Xitrum 3.28.16 Feb 18 2019
- Xitrum 3.28.15 Dec 9 2018
- Xitrum 3.28.14 Nov 3 2018
- Xitrum 3.28.13 Oct 17 2018
- Xitrum 3.28.12 Oct 7 2018
- Xitrum 3.28.11 Sep 2 2018
- Xitrum 3.28.10 Jul 25 2018
- Xitrum 3.28.9 May 25 2018
- Xitrum 3.28.8 Feb 27 2018
- Xitrum 3.28.7 Jan 24 2018
- Xitrum 3.28.6 Nov 25 2017
- Xitrum 3.28.5 Aug 25 2017
- Xitrum 3.28.4 May 25 2017
- Xitrum 3.28.3 Mar 28 2017
- Xitrum 3.28.2 Jan 12 2017
- Xitrum 3.28.1 Oct 2 2016
- Xitrum 3.28.0 Aug 4 2016
- Xitrum 3.27.0 Jul 18 2016
- Xitrum 3.26.2 Jun 22 2016
- Xitrum 3.26.1 May 31 2016
- Xitrum 3.26.0 Jan 09 2016
- Xitrum 3.25.0 Aug 14 2015
- Xitrum 3.24.0 May 24 2015
- Xitrum 3.23 Mar 14 2015
- Xitrum 3.22 Jan 20 2015
- Xitrum 3.21 Dec 18 2014
- Xitrum 3.20 Dec 12 2014
- Xitrum 3.19 Nov 14 2014
- Xitrum 3.18 Aug 19 2014
- Xitrum 3.17 Aug 01 2014
- Xitrum 3.16 Jul 09 2014
- Xitrum 3.15 Jul 05 2014
- Xitrum 3.14 Jun 16 2014
- Xitrum 3.13 May 23 2014
- Xitrum 2.15 Dec 25 2013