


Wow, this is a really impressive body of work, arguably the most complete Scala framework outside of Lift (but much easier to use). Xitrum is truly a full stack web framework, all the bases are covered, including wtf-am-I-on-the-moon extras like ETags, static file cache identifiers & auto-gzip compression. Tack on built-in JSON converter, before/around/after interceptors, request/session/cookie/flash scopes, integrated validation (server & client-side, nice), built-in cache layer (Hazelcast), i18n a la GNU gettext, Netty (with Nginx, hello blazing fast), etc. and you have, wow.
특장점
There are comprehensive usage guides for many languages.
- 스칼라의 사상에 기반하여 Typesafe 합니다. 모든 API는 가능한 typesafe 하도록 되어 있습니다.
- 비동기, Netty 사상을 기반으로, 모든 요청에 즉시 응답할 필요가 없습니다. Long polling, chunked response (streaming), WebSocket, ,SockJS 가 지원됩니다.
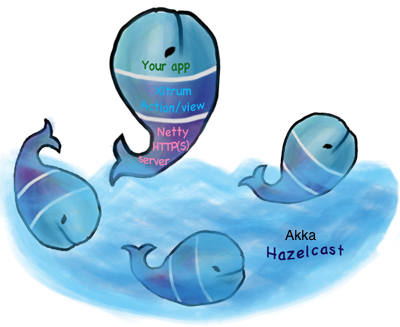
- Netty 에 내장된 고속 HTTP(s) 서버. (Java 엔진과 OpenSSL 엔진중 선택할수 있습니다.) Xitrum 의 정적 파일 속도는 Nginx 와 비슷합니다.
- 고속응답을 위한 서버측과 클라이어트 양측의 대용량 캐시. 웹서버 레이어에서는 작은 파일들은 메모리에 캐시되고 큰 파일들은 NIO의 zero copy를 이용합니다. 웹 프레임워크 레이어 에서는 Rails 처럼 page, action,object cache 를 선언할 수 있습니다. All Google’s best practices 에 있는것 처럼 조건부 GET 에 대해 클라이언트측 캐싱을 할 수 있습니다. 물론 브라우저에 강제로 요청을 재전송 할 수도 있습니다.
- 정적 파일을 위한 Range requests 지원. 스마트폰으로의 동영상 전송시 다운로드 중지/재개가 가능합니다.
- CORS 지원.
- JAX-RS 와 Rails 사상에 기반한 자동 경로 수집. 경로를 한곳에 모을 필요가 없습니다. 이 분산 경로 기능으로 어플리케이션을 다른 어플리케이션에 쉽게 넣을 수 있습니다. 블로그 엔진을 만든다면, JAR 파일로 묶어서 다른 어플리케이션에 넣으면 자동으로 기능을 수행할것 입니다. 라우팅은 양방향입니다: URL들을 typesafe 한 방법으로 재 생성이 가능합니다.(리버스 라우팅) Swagger Doc 을 이용하여 라우팅을 문서화 할수도 있습니다.
- 개발모드에서는 클래스와 경로는 자동으로 재생 됩니다.
- 독립적인 Scalate 템플릿이나 스칼라 인라인 XML을 이용하여 뷰를 작성할 수 있습니다.둘 모두 typesafe 합니다.
- 세션은 (확장을 위해)쿠키에 저장되거나 (안정성을 위해) Hazelcast 에 저장됩니다. 연속적인 요청이 필요한 액션일 경우 일반적으로 쿠키에 담기에 너무 크기 때문에 Hazelcast 가 적합힙니다. 또한 프로세스간 분산캐시(더 빠르고 편한)와 pub/sub를 제공하기 때문에 따로 서버를 구축할 필요가 없습니다.
- jQuery Validation 로 브라우저와 서버에서 검증을 합니다.
- 국제화는 GNU gettext 를 사용하여 자동으로 추출되어 번역되므로, 속성파일들에 대한 번거로움이 사라집니다. 번역 및 병합에 강력한 툴인 Poedit 를 사용할 수 있습니다. gettext는 다른 솔루션과 달리 단수와 복수를 지원합니다.
- Xitrum 은 Scalatra 와 Lift 사이의 스펙트럼을 채우려고 하고 있습니다: Scalatra 보다 강력하고 Lift 보다 쉽게 RESTful API와 Postback 을 쉽게 구축할 수 있습니다. Xitrum 은 Scalatra 처럼 controller-first 입니다, view-first 인 Lift 와는 다릅니다.. 대다수가 controller-first를 사용하고 있습니다.
확장은 쉽게, 노드를 풀에 던지기만 하면 됩니다.
Hello World 예제
import xitrum.Action
import xitrum.annotation.GET

@GET("url/to/HelloAction")
class HelloAction extends Action {
  def execute() {
    val urlToHelloActor = url[HelloActor]
    respondHtml(
      <xml:group>
        <p>Hello {remoteIp}!</p>
        <a href={urlToHelloActor}>Actor example</a>
      </xml:group>
    )
  }
}
The above action runs directly on Netty's IO thread pool.
It's very fast if your action is simple.
If it's more complex, avoid blocking
request receiving and response responding,
by running it on another thread pool,
by extending xitrum.FutureAction.
Actor 예제
import scala.concurrent.duration._
import akka.actor.ReceiveTimeout

import xitrum.ActorAction
import xitrum.annotation.GET

@GET("url/to/HelloActor")
class HelloActor extends ActorAction {
  def execute() {
    log.info("Request received: " + request)

    // Communicate with another actor
    anotherActorRef ! "aMsg"

    // Wait for the above actor to reply within 5s
    context.setReceiveTimeout(5.seconds)
    context.become {
      case aReply =>
        respondText(aReply)

      case ReceiveTimeout =>
        respondText("Timeout")
    }
  }

  override def postStop() {
    log.info("Connection closed or response sent")
    super.postStop()
  }
}
Just annotate your actors and they will be accessible from web!
WebSocket 예제
import xitrum.{
  WebSocketAction,
  WebSocketText, WebSocketBinary,
  WebSocketPing, WebSocketPong
}
import xitrum.annotation.WEBSOCKET

@WEBSOCKET("url/to/EchoWebSocketActor")
class EchoWebSocketActor extends WebSocketAction {
  def execute() {
    log.info("WebSocket onopen")

    context.become {
      case WebSocketText(text) =>
        respondWebSocketText(text)

      case WebSocketBinary(bytes) =>
        respondWebSocketBinary(bytes)

      case WebSocketPing =>
        // Xitrum automatically sends pong for you,
        // you don't have to send pong yourself

      case WebSocketPong =>
        // Client has received your ping
    }
  }

  override def postStop() {
    log.info("WebSocket onclose")
    super.postStop()
  }
}
SockJS 예제
import xitrum.{SockJsAction, SockJsText}
import xitrum.annotation.SOCKJS

@SOCKJS("url/to/EchoSockJsActor")
class EchoSockJsActor extends SockJsAction {
  def execute() {
    log.info("SockJS onopen")

    context.become {
      case SockJsText(text) =>
        respondSockJsText(text)
    }
  }

  override def postStop() {
    log.info("SockJS onclose")
    super.postStop()
  }
}
프리젠테이션
템플릿을 이용하여 Xitrum 프로젝트 생성하기
xitrum-new project 를 참고하여
xitrum-new.zip 파일을 다운로드, 압축을 풀고, 실행합니다:
sbt/sbt run빈 프로젝트가 http://localhost:8000/ 와 https://localhost:4430/ 에서 가동되는것을 볼 수 있습니다.
Eclipse 프로젝트 생성:
sbt/sbt eclipse데모 프로젝트들
News
- Xitrum 3.30.1 Jan 20 2021
- Xitrum 3.30.0 Jan 18 2021
- Xitrum 3.28.18 Sep 7 2019
- Xitrum 3.28.17 Jun 4 2019
- Xitrum 3.28.16 Feb 18 2019
- Xitrum 3.28.15 Dec 9 2018
- Xitrum 3.28.14 Nov 3 2018
- Xitrum 3.28.13 Oct 17 2018
- Xitrum 3.28.12 Oct 7 2018
- Xitrum 3.28.11 Sep 2 2018
- Xitrum 3.28.10 Jul 25 2018
- Xitrum 3.28.9 May 25 2018
- Xitrum 3.28.8 Feb 27 2018
- Xitrum 3.28.7 Jan 24 2018
- Xitrum 3.28.6 Nov 25 2017
- Xitrum 3.28.5 Aug 25 2017
- Xitrum 3.28.4 May 25 2017
- Xitrum 3.28.3 Mar 28 2017
- Xitrum 3.28.2 Jan 12 2017
- Xitrum 3.28.1 Oct 2 2016
- Xitrum 3.28.0 Aug 4 2016
- Xitrum 3.27.0 Jul 18 2016
- Xitrum 3.26.2 Jun 22 2016
- Xitrum 3.26.1 May 31 2016
- Xitrum 3.26.0 Jan 09 2016
- Xitrum 3.25.0 Aug 14 2015
- Xitrum 3.24.0 May 24 2015
- Xitrum 3.23 Mar 14 2015
- Xitrum 3.22 Jan 20 2015
- Xitrum 3.21 Dec 18 2014
- Xitrum 3.20 Dec 12 2014
- Xitrum 3.19 Nov 14 2014
- Xitrum 3.18 Aug 19 2014
- Xitrum 3.17 Aug 01 2014
- Xitrum 3.16 Jul 09 2014
- Xitrum 3.15 Jul 05 2014
- Xitrum 3.14 Jun 16 2014
- Xitrum 3.13 May 23 2014
- Xitrum 2.15 Dec 25 2013